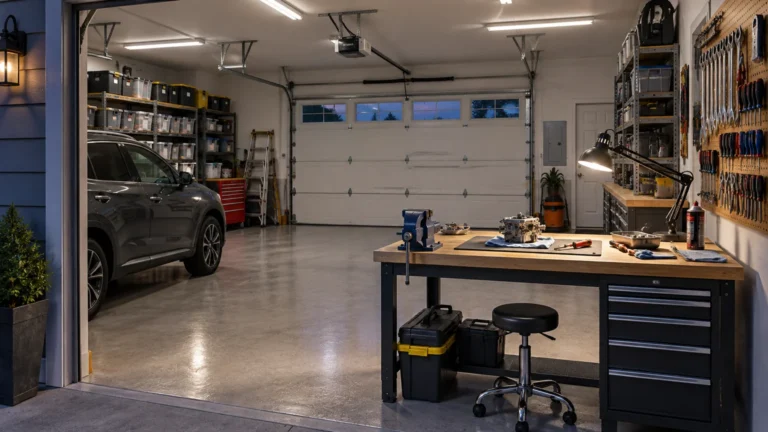
Garage Lighting Layout: Fewer Bright Fixtures vs More Even Fixtures
TLDR
For most garages, several moderately bright fixtures arranged in two or more rows produce more useful light than one or two extremely bright fixtures. Build the garage lighting layout around vehicles, door tracks, the raised door, storage and work surfaces. Use distributed overhead fixtures for movement and parking, then add separately controlled task lighting at the workbench. The goal is light on the floor and work surface—not the largest lumen number on the package.
A good garage lighting layout controls shadows. One bright fixture in the middle may make an empty floor look impressive, yet leave vehicle sides, lower shelves and the workbench dark. Once a car, open garage door or person blocks that central light, much of its output stops helping.
Start with a rough floor plan before shopping. Mark the vehicle bays, walking routes and work zones, then distribute general lighting across those areas. Treat benches, tool walls and inspection stations as separate tasks that need their own light. This layered approach is more flexible than trying to make one fixture do everything.
Why more even fixtures usually beat fewer bright ones
Fixture lumens describe emitted light, but they do not tell you how much useful illumination reaches the garage floor or a bench. The Illuminating Engineering Society explains illuminance in terms of maintained light levels at the relevant task surface. Its illuminance guidance is a useful reminder that fixture output and usable light are not the same measurement.
Distribution matters because garages are full of obstructions. Vehicles block downward light. Raised doors create broad ceiling-level barriers. Open shelving produces small, hard shadows. A person standing at a bench can block a ceiling fixture positioned behind them.
Multiple fixtures spread across the ceiling send light toward an object from several directions. If one path is blocked, another fixture can still illuminate the area. This improves visibility without requiring every fixture to be painfully bright. It also reduces the severe bright-and-dark contrast that makes a garage feel poorly lit even when its total lumen count looks adequate.
There are exceptions. A small, open single-car garage used only for parking may work with a couple of broad-distribution fixtures. A tall garage may need high-output luminaires designed for its mounting height. The practical rule is not “buy more fixtures at all costs.” It is “favor enough light sources to cover the space evenly.”
Map the garage before placing lights
Draw a simple top-down sketch and record where each obstruction sits. Include the overhead-door tracks, opener rail and motor, door position when fully raised, cabinets, ceiling racks, shelving, workbench, utility equipment and electrical panel. Mark ceiling joists or existing junction boxes if they affect installation.
- Outline each vehicle bay and the usual position of the parked vehicle.
- Mark walking space along both sides of each vehicle, not just the open center aisle.
- Draw the overhead door in its raised position because it may block ceiling fixtures near the entrance.
- Mark the workbench edge, vise, tool wall and any machine where close work occurs.
- Identify tall cabinets, overhead storage and shelves that could intercept light.
- Keep fixtures and wiring clear of moving door components and preserve access for opener and door service.
- Note dark finishes, high ceilings and dusty areas, which can reduce useful reflected light.
Do this with the garage in its normal working condition. A layout planned in an empty room can fail after cars, rolling cabinets and storage bins return.
A practical overhead layout for one- and two-car garages
In a typical rectangular garage, begin with longitudinal rows running from the garage door toward the rear wall. Position the rows over useful open areas beside or between vehicle bays rather than directly over the centerline of a parked vehicle. This generally illuminates vehicle sides and walking lanes better than a single central row.
For a one-car garage, two rows commonly provide a useful starting concept: one on each side of the vehicle bay. For a two-car garage, start by evaluating two or three longitudinal rows—outer rows for the wall-side walking areas and, when needed, a center row for the space between vehicles. These are layout concepts, not fixed fixture counts.
Linear fixtures often work well parallel to the vehicle length because they create continuous coverage along the bay and fit between common track arrangements. Perpendicular placement can still make sense in a short garage, with wide-distribution fixtures or where joists and existing boxes dictate installation. Judge orientation by coverage and obstruction, not appearance alone.
Avoid putting every fixture in the zone covered by the raised garage door. When open, the door can block light from reaching the entrance and vehicle hood. A rear row or fixtures outside the door’s overhead footprint keep part of the room illuminated while the door is raised. Confirm clearances through the door’s complete travel before drilling or mounting anything.
How far apart should garage lights be?
There is no dependable universal spacing number. Mounting height, beam distribution, fixture length, ceiling reflectance and obstructions all change the result. Begin with an evenly spaced grid, but move fixtures to clear tracks, openers and storage. Then check the selected fixture’s photometric or spacing guidance rather than assuming every LED strip covers the same area.
If possible, temporarily power a plug-in fixture or use a portable work light from the proposed locations. Park the vehicles, open the overhead door and stand at the bench. This is not a photometric calculation, but it can reveal obvious shadow problems before permanent installation.
Choose light levels by what happens in each zone
Planning targets should describe illuminance at the surface being used. A vendor guide offers approximately 20 foot-candles for storage, 50 for general garage or workshop activity and 100 for fine work. Treat these as rough planning proxies, not residential code requirements or guaranteed results. The same guide notes that room color, ceiling height, dust and fixture arrangement affect delivered light.
| Garage zone | Planning priority | Practical lighting approach |
|---|---|---|
| Parking and storage | Safe movement and finding stored items | Even general light with limited glare |
| General DIY area | Seeing tools, fasteners and mechanical parts | Distributed overhead light plus portable task light where needed |
| Workbench | Controlling hand and body shadows | Dedicated task fixture ahead of or beside the worker |
| Paint, finish or inspection area | Seeing color and surface defects | High-quality local light with good color rendering |
| Rear shelves and cabinets | Reading labels and seeing shelf contents | A separate rear fixture or local cabinet lighting |
A lumen calculation can provide an initial purchasing estimate, but it cannot finalize the layout. One illustrated method assumes only part of the fixture output reaches the working plane, while acknowledging that the delivery rate varies with the room and installation. Manufacturer photometric data or a lighting calculation is the better basis for a high-ceiling, unusually shaped or precision-oriented workshop.
Give the workbench its own task lighting
Bright overhead lighting does not eliminate the need for bench lighting. If the ceiling fixture is behind you, your head and shoulders cast a shadow exactly where small parts, measurement marks and cutting lines need to be visible.
Mount the task light ahead of the normal standing position or slightly to the side. An under-cabinet linear fixture can wash the benchtop without occupying ceiling space. An adjustable arm light works well for inspection, sharpening or electronics because its direction can change with the job. Lighting the vertical tool board or backsplash can also make outlines, labels and small tools easier to see.
Control bench lights separately from the general fixtures. That lets you use concentrated light for short jobs without operating the entire garage, and it makes the bench layer easier to upgrade later. For a fuller explanation of the two layers, see task lighting versus general workshop lighting.
Match the fixture format to its job
| Fixture type | Best layout role | Watch for |
|---|---|---|
| Linear shop or strip fixture | Long rows over vehicle bays and walking lanes | Glare, linking limits and visible cords or wiring |
| Wraparound surface fixture | Broad general light from an existing ceiling box | Lens clearance and output trapped by obstructions |
| Recessed or wafer light | Finished ceilings where low profile matters | More fixtures may be needed for even coverage |
| High-output point-source fixture | High ceilings or large open bays | Harsh contrast and dark areas behind vehicles or storage |
| Under-cabinet linear light | Workbench and tool-wall lighting | Reflections, direct glare and driver location |
| Adjustable task light | Inspection and precision work | Secure mounting and protected cords |
Do not compare fixtures by wattage alone. Check lumen output, distribution, mounting height, dimmer or sensor compatibility, operating-temperature range and whether the product is intended for an enclosed fixture. The U.S. Department of Energy warns that an enclosure can trap heat and affect LED performance and life when a lamp is not specified for enclosed use.
Color temperature and CRI: useful, but not brightness ratings
A 4000K neutral-white fixture is a practical starting point for a general-purpose garage. Some people prefer 5000K for inspection or detailed mechanical work, but higher Kelvin does not mean higher output or better performance. Correlated color temperature describes the appearance of the light, not an inherent quality ranking.
Color rendering index matters when distinguishing wire colors, matching paint, reading colored labels or inspecting finishes. DOE says 80 CRI is generally recommended for interior lighting, while 90 or higher indicates excellent color fidelity. A general garage can work well at 80-plus CRI, while a paint, detailing or close-inspection bench may justify 90-plus CRI.
Divide controls by how the garage is used
At minimum, consider separate control for general overhead lighting and the workbench. A larger garage may benefit from a third rear-storage or utility zone. Zoning prevents an all-or-nothing system and makes troubleshooting simpler.
- Keep a convenient manual control even when using an occupancy or motion sensor.
- Confirm that LED drivers, dimmers and sensors are compatible before purchase.
- Check the manufacturer’s maximum number of linked fixtures and total connected load.
- Aim sensors away from moving door panels, outdoor traffic or other sources of nuisance activation.
- Consider whether a short sensor timeout could leave someone working quietly at a bench in the dark.
- Label switches clearly when several zones share one wall box.
Controls cannot compensate for a weak physical layout. A dimmer can reduce excessive output, but it cannot fill a vehicle shadow or move light around a raised garage door.
Safety and purchase checklist
Garages vary from clean, conditioned rooms to humid spaces exposed to dripping vehicles and wind-driven rain. Check the environmental marking rather than assuming every shop light suits every garage. UL guidance distinguishes dry, damp and wet locations: damp-rated luminaires are intended for damp or dry locations, while wet-location marking applies where water may drip, splash or flow on the equipment.
- Verify an appropriate listing or certification and the required dry, damp or wet location rating.
- Confirm that the fixture is approved for its mounting orientation and ceiling type.
- Use a supported electrical box and mounting hardware suitable for the fixture’s weight.
- Maintain clearance from door tracks, springs, cables, opener hardware and the fully raised door.
- Follow enclosure, insulation-contact and operating-temperature restrictions.
- Protect cords from vehicles, sharp edges, moving hardware and hot equipment.
- Follow manufacturer instructions for linked fixtures, drivers, dimmers and sensors.
- Verify local permit and electrical-code requirements before altering fixed wiring.
Hire a qualified electrician for a new circuit, panel work, damaged wiring, uncertain circuit identification, recurring breaker trips or any installation beyond your ability to isolate and verify safely. Local rules may also require permits or professional work. Do not use extension cords as permanent wiring or mount fixtures where garage-door movement can strike them.
The practical next step
Sketch the garage, including the door in its raised position. Mark vehicle edges, walking lanes, storage and precision-work areas. Start with evenly distributed overhead rows that remain useful around parked vehicles and door hardware. Then add local task lighting wherever your body, cabinets or equipment would block the ceiling light.
Choose fixtures only after that layout is clear. Fewer bright fixtures may look cheaper and simpler, but more evenly placed fixtures usually create a garage that is easier to park in, work in and organize. The best result is not the brightest ceiling—it is consistent light where your eyes and hands actually need it.